Purpose: This manual will help you install RichWP Classic Themes. These themes are outdated and just here for reference, but feel free to have fun. Installing these themes is easy. Do not worry, this themes is a professional, streamlined WordPress theme from back in the day (2017-2020).
Installation will be a breeze!
Just make sure to read this manual until the end, as these instructions will save you a lot of time. Note that it is out of the scope of this manual to explain WordPress basics. For all general WordPress questions, please consult the official codex.
- Uploading and Activating the Theme
- Setting up the Menus
- Setting Up the Icon Menu
- Setting Up Title, Logo, and Site Icons
- Configuring Colors
- Applying Page Templates
- Configuring Widgets
- Configuring Media Settings
- Adding Featured Images and Automatic Video Thumbnails
- Completing the Author Box
- Building Contact Forms, Social Sharing Buttons & Galleries
- Customizing the Theme
- Configuring Google and Other External Fonts
- Support & Installation Services
Uploading and Activating the Theme
Upload the themename.zip file via the theme upload function Themes » Install Themes » Upload in your WordPress Administration (wp-admin) and activate the theme.
Setting up the Menus
Next, set up your Primary-, Icon- and Footer Menus under Appearance » Menu in your WordPress Administration.
If you have WooCommerce installed and activated, you will also see a “Menu Shop” in your menu location list.
The Primary, Footer, and Shop menu setup work like the standard WordPress themes. In general, you choose your pages, posts, categories, tags, WooCommerce endpoints, or custom links on the left and add them to the Primary Menu.
Make sure that you select the correct locations for your menu:

As you can see in the theme demo, the Primary and Shop Menu allow you to set up a multi-level drop down structures. To do this, simply drag and drop your menu items into the right position and stack accordingly:

Note: The Footer menu must have a flat one level structure.
Setting Up the Icon Menu
Click on the Create a new menu button next to the select menu box to create a new menu and select the Icon Menu location. To set up icons to your social networks like Twitter, Facebook, and others, simply copy and paste the URLs to custom link items and add them to the menu. The icons will automatically appear in your icon menu:
Setting up Icon CSS Classes
To add other icons, not related to social media sites, to your site, you must set up the icons with their css-classes. This will also speed up your site since it directly tells the theme which icon to use so that it does not have to read out your social media URLs via JavaScript.
The following icons are available for social media sites (the list also shows the icons CSS classes):
- G+: icon-gplus
- Twitter: icon-twitter
- Facebook: icon-facebook
- Pinterest: icon-pinterest
- Youtube: icon-youtube
- Vimeo: icon-vimeo
- Tumblr: icon-tumblr
- Flikr: icon-flikr
- LinkedIn: icon-linked-in
- Soundcloud: icon-soundcloud
- XING: icon-xing
- Shopping Cart: icon-basket
- Email: icon-email
- User Login: icon-user
- RSS: icon-rss
- Spotify: icon-spotify
- Weibo: icon-weibo
Enabling CSS Classes
To set up the icons with their CSS classes, make sure that menu CSS classes are enabled. In the top right corner on Appearance » Menu page, click “Screen Options” and tick the box next to “CSS Classes”:

Let us set up the Shopping Cart icon for example. Include the menu element to my WooCommerce Shopping Cart in the menu editor. Click on the menu element to show its options. Add the icon-basket CSS class into the CSS Classes field:
Should you know your way around CSS, feel free to add different icons as the ones listed above to the icon font. If you need help, feel free to write in and we can add the needed icons for you for a little service charge.
Any programmer familiar with CSS should be able to help you as well. The icons used are from Fontello. To automatically add the already existing icons, you find a config.json file for Fontello in the font folder of your theme.
Setting Up Title, Logo, and Site Icons
Set up your Logo or Page Title under Appearance » Customize » Site Identity. To set up an image logo, we recommend using a resized .png or an .svg file with a transparent background. Be sure to test your logo on smart phones and tablets, as well.
Configuring Colors
All color options for this theme can be found under Appearance » Customize » Colors. You can make this theme your own by exploring these color options and choosing a unique color scheme for your theme. To change colors that are not affected by the Customizer Color Settings, edit them directly in the style.css file of your theme or overwrite them with a Custom CSS box or with a Child Theme.
Applying Page Templates
The Theme comes with a variety of page templates that you can apply to your pages (not posts). The purpose of these page templates is to provide alternative layout options if you want to set up a static front page or simply focus your visitors’ attention directly on the page content. These templates can be useful for shop function pages like cart or checkout, where you don’t want to distract visitors from finishing a sale.
The Full-Width Page Template uses the whole content container width for the content, so that no sidebar will be displayed.
The Full-Width without Title Page Template does the same, except that it doesn’t display a title.
You can also apply the Subpage List Page Template to a parent page to ensure that all of the page’s child pages will be listed under the content box.
Configuring Widgets
The theme comes with several Widget Areas. Set up your widgets under “Appearance » Widgets” in your WordPress Admin.
IMPORTANT: If you want to use a sidebar, make sure that you have enough widgets added to fill the height of large screens. Since we use a so called sticky sidebar, you will have a white space gap at the top of the sidebar if you don’t have enough content added.
If you need additional widgets, try a plugin search under “Plugins » Add New”. You can find a rotating banner, advertising-related widgets, email sign up forms from your favorite email service, and much more.
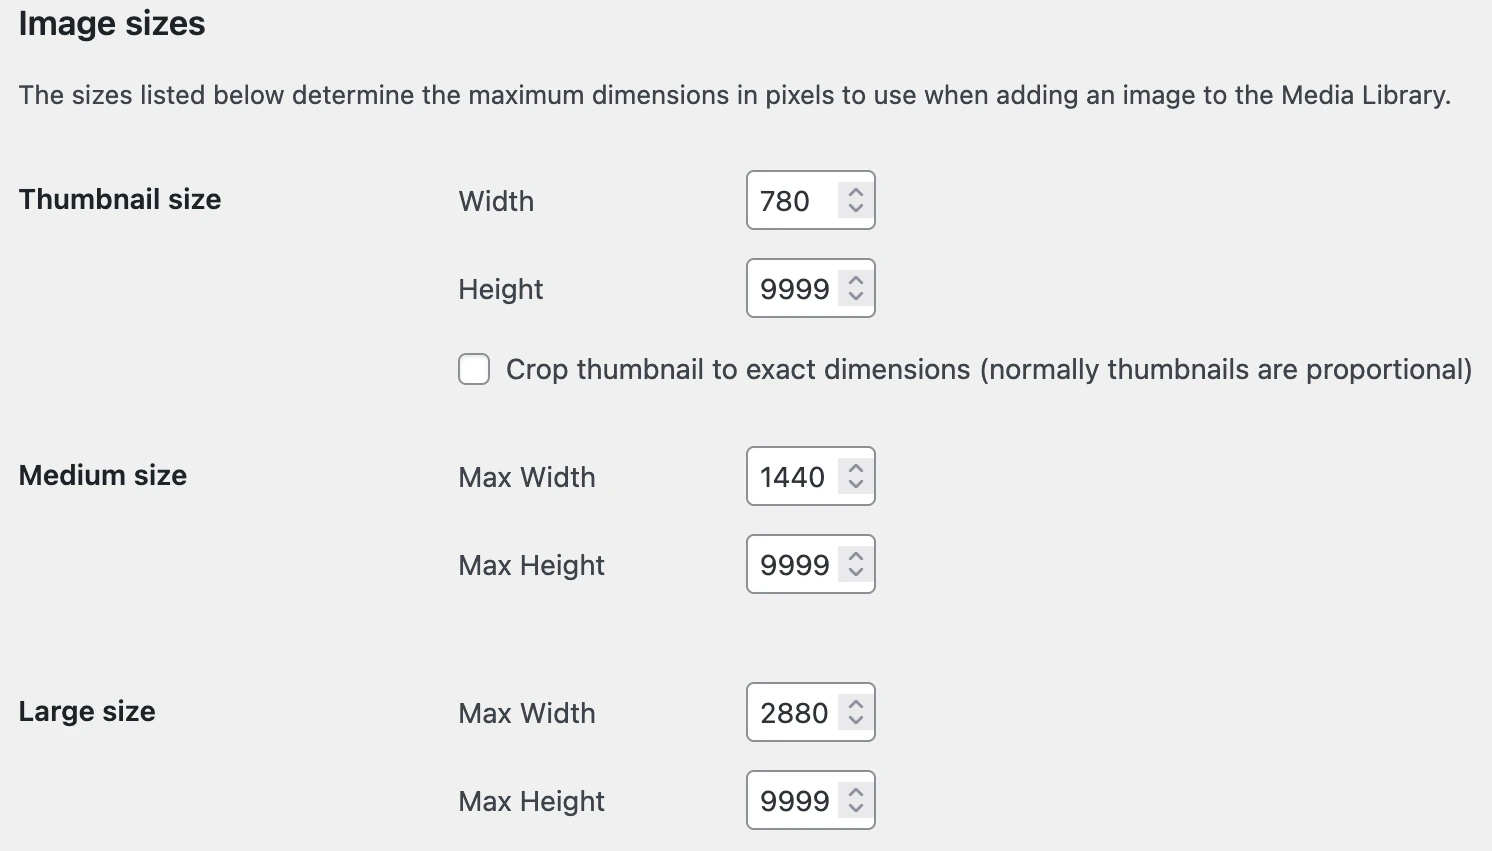
Configuring Media Settings
The Theme natively creates all the relevant image sizes for your site. However, you might want to create thumbnails for your galleries or larger product images for your shop. You can set them up under Settings » Media in your WordPress Administration.
In the demo I use the following sizes:
To install the theme on an established site on which you uploaded images before you activated the Theme, you should run a plugin to create the image sizes needed for the theme. We recommend the free “Regenerate Thumbnails” plugin, available here https://wordpress.org/plugins/regenerate-thumbnails/
Adding Featured Images and Automatic Video Thumbnails
In general, it is a good idea to add featured images to all your posts and pages! The theme will scale the featured images to the appropriate sizes. If you use this theme on an existing site, you can regenerate the necessary image sizes with a plugin as described above.
Many video thumbnail plugins are available to automatically create video thumbnails. We recommend Video Thumbnails, available at http://wordpress.org/extend/plugins/video-thumbnails/, but there are many others available.
Completing the Author Box
Complete the information to be displayed in the author box under Users » All Users » Edit or simply under Users » Your profile.
Building Contact Forms, Social Sharing Buttons & Galleries
In the RichWP theme demos as well as on most of our personal sites, we use the functionality of the WordPress Jetpack plugin to build our contact forms and add social sharing buttons and galleries, but feel free to use your own plugin of choice.
Before using gallery and video player plugins, you should ensure that they work well in a responsive environment.
Customizing the Theme
Besides using the built in customization options, feel free to modify the code in any way you like. For simple CSS modifications, a custom CSS plugin or the Custom CSS Functionality of the Jetpack plugin comes in handy. RichWP themes are Child Theme ready and we recommend to create a child theme for any other code modifications. This way your site stays update-proof.
For reference you find uncompressed versions of the CSS and JS code under in the theme folder under /assets/uncompressed.
Configuring Google and Other External Fonts
You can use Google and other external fonts with the RichOne Theme. For performance reasons, we did not include a list with hundred of fonts plus the other necessary option settings directly into the theme itself. The easiest way is to use external fonts is to install a plugin like this one WP-Google-Fonts, FontMeister or Fonto. There are more plugins providing this functionality out there, so feel free to try some and use the one that best fits your purpose.